This guide assumes that you already have the picture you want to use saved to your computer. You can then browse to the picture you want to use and select it.  Find out how to add page numbers in Google Docs or your school or organization requires them for documents you create. Launch Google Slides and create a new, blank presentation. Using pictures often makes your content more understandable and memorable to audiences. Try another way. You really want to move and resize the picture around as a background. Along with attracting attention, using images and visuals throughout your presentation can enable you to maintain the attention of audiences over a long period. You can also access the image by exploring your Drive or Photos applications, searching by URL or taking a picture with the Camera function. Related: .css-1v152rs{border-radius:0;color:#2557a7;font-family:"Noto Sans","Helvetica Neue","Helvetica","Arial","Liberation Sans","Roboto","Noto",sans-serif;-webkit-text-decoration:none;text-decoration:none;-webkit-transition:border-color 200ms cubic-bezier(0.645, 0.045, 0.355, 1),background-color 200ms cubic-bezier(0.645, 0.045, 0.355, 1),opacity 200ms cubic-bezier(0.645, 0.045, 0.355, 1),border-bottom-color 200ms cubic-bezier(0.645, 0.045, 0.355, 1),border-bottom-style 200ms cubic-bezier(0.645, 0.045, 0.355, 1),border-bottom-width 200ms cubic-bezier(0.645, 0.045, 0.355, 1),border-radius 200ms cubic-bezier(0.645, 0.045, 0.355, 1),box-shadow 200ms cubic-bezier(0.645, 0.045, 0.355, 1),color 200ms cubic-bezier(0.645, 0.045, 0.355, 1);transition:border-color 200ms cubic-bezier(0.645, 0.045, 0.355, 1),background-color 200ms cubic-bezier(0.645, 0.045, 0.355, 1),opacity 200ms cubic-bezier(0.645, 0.045, 0.355, 1),border-bottom-color 200ms cubic-bezier(0.645, 0.045, 0.355, 1),border-bottom-style 200ms cubic-bezier(0.645, 0.045, 0.355, 1),border-bottom-width 200ms cubic-bezier(0.645, 0.045, 0.355, 1),border-radius 200ms cubic-bezier(0.645, 0.045, 0.355, 1),box-shadow 200ms cubic-bezier(0.645, 0.045, 0.355, 1),color 200ms cubic-bezier(0.645, 0.045, 0.355, 1);border-bottom:1px solid;cursor:pointer;}.css-1v152rs:hover{color:#164081;}.css-1v152rs:active{color:#0d2d5e;}.css-1v152rs:focus{outline:none;border-bottom:1px solid;border-bottom-color:transparent;border-radius:4px;box-shadow:0 0 0 1px;}.css-1v152rs:focus:not([data-focus-visible-added]){box-shadow:none;border-bottom:1px solid;border-radius:0;}.css-1v152rs:hover,.css-1v152rs:active{color:#164081;}.css-1v152rs:visited{color:#2557a7;}@media (prefers-reduced-motion: reduce){.css-1v152rs{-webkit-transition:none;transition:none;}}.css-1v152rs:focus:active:not([data-focus-visible-added]){box-shadow:none;border-bottom:1px solid;border-radius:0;}How To Add a Page Border in Microsoft Word in 4 Simple Steps.css-r5jz5s{width:1.5rem;height:1.5rem;color:inherit;display:-webkit-inline-box;display:-webkit-inline-flex;display:-ms-inline-flexbox;display:inline-flex;-webkit-flex:0 0 auto;-ms-flex:0 0 auto;flex:0 0 auto;height:1em;width:1em;margin:0 0 0.25rem 0.25rem;vertical-align:middle;}. This option works well when you dont need a lot of text and dont need editable text unless you include some around the image. Contact Us | Privacy Policy | TOS | All Rights Reserved, Hi, the image/text looks pixelated when doing this (insert>drawing). If you need to put a picture into your document in Google Docs and are encountering issues, then our guide below will help you to find the menu option where you can find and insert your image. Click the "Background" tab near the top of the window to open the dialog box and explore more background options. Then, open a new Google Docs document and insert the image. These options include: If you click on a picture in your slideshow, aside from the controls that appear around the image which let you resize, rotate or move it, there are going to be buttons in the toolbar that let you Crop the image, Reset the image, or choose from a variety of Format options. Find the image. If you havent used your Google Photos library a lot before, then it might be a good idea to start taking advantage of it if you are going to add photos frequently. While there may already be a text box on your slide, you can also add new ones by selecting "Insert" and "Text box." Then, go to the next page and use the Control + V or Command + V shortcut to paste the image. Required fields are marked *. Any setting I might be missing? Open the Docs document with the text you want to use. To do this you can click the Insert tab, choose Image, then select an option. Open the Docs document with the proper text on it. His main writing topics include iPhones, Microsoft Office, Google Apps, Android, and Photoshop, but he has also written about many other tech topics as well. Yes! Explore more image options. Explore more background options. If you have other suggestions or approaches, then, by all means, share them with us in the comments section at the end of this article! Putting an image behind the text on your Google Doc can add meaning and visual interest to your presentation. Along with a picture, you can also change your background to a color or gradient. More Information on How to Add a Picture to Google Docs, how to add superscript or subscript to Google Docs, how to remove space between paragraphs in Google Docs, How to add a row to a table in Google Docs, How to insert a horizontal line in Google Docs, How to change to landscape orientation in Google Docs. You can put a picture in Google Slides by clicking the Insert image button in the toolbar, selecting the desired image source, then finding the image and selecting it. For example, by selecting the "Adjustments" option, you can change the transparency, brightness and contrast of the visual. They can also add extra context and meaning to text and encourage a new perspective on a topic. Right-click the image and select "Image options." Next, open the correct .docx file from Word, select the "Insert" tab on the top of your window and choose the "Pictures" option from the main ribbon. Youll see a small pop-up that says, Move the slider to the right to adjust your.
 ![]() If you prefer to stick with Google Docs to create your background image under text, you can use the Drawings feature and add text boxes. Here are some steps for putting an image behind text using the Slides method: Create a Slides presentation in the correct size. Our tutorial continues below with additional discussion on adding photos to documents in Google. For more details on how to correctly size and position your image, see Size and Position Shapes. Its not editable text, but it works. Our tutorial continues below with additional discussion about how to put a picture on Google Docs. Another option for creating a simple document with a background image using just Google tools is to utilize Google Slides. You can now choose the "Behind text" option to put the image behind the text. Matthew Burleigh has been writing tech tutorials since 2008. Then, select the "Text wrapping" option and open the drop-down menu. Your options for editing images in the app are restricted to a handful of tools that appear in the menu bar at the bottom of the screen. Related: .css-1v152rs{border-radius:0;color:#2557a7;font-family:"Noto Sans","Helvetica Neue","Helvetica","Arial","Liberation Sans","Roboto","Noto",sans-serif;-webkit-text-decoration:none;text-decoration:none;-webkit-transition:border-color 200ms cubic-bezier(0.645, 0.045, 0.355, 1),background-color 200ms cubic-bezier(0.645, 0.045, 0.355, 1),opacity 200ms cubic-bezier(0.645, 0.045, 0.355, 1),border-bottom-color 200ms cubic-bezier(0.645, 0.045, 0.355, 1),border-bottom-style 200ms cubic-bezier(0.645, 0.045, 0.355, 1),border-bottom-width 200ms cubic-bezier(0.645, 0.045, 0.355, 1),border-radius 200ms cubic-bezier(0.645, 0.045, 0.355, 1),box-shadow 200ms cubic-bezier(0.645, 0.045, 0.355, 1),color 200ms cubic-bezier(0.645, 0.045, 0.355, 1);transition:border-color 200ms cubic-bezier(0.645, 0.045, 0.355, 1),background-color 200ms cubic-bezier(0.645, 0.045, 0.355, 1),opacity 200ms cubic-bezier(0.645, 0.045, 0.355, 1),border-bottom-color 200ms cubic-bezier(0.645, 0.045, 0.355, 1),border-bottom-style 200ms cubic-bezier(0.645, 0.045, 0.355, 1),border-bottom-width 200ms cubic-bezier(0.645, 0.045, 0.355, 1),border-radius 200ms cubic-bezier(0.645, 0.045, 0.355, 1),box-shadow 200ms cubic-bezier(0.645, 0.045, 0.355, 1),color 200ms cubic-bezier(0.645, 0.045, 0.355, 1);border-bottom:1px solid;cursor:pointer;}.css-1v152rs:hover{color:#164081;}.css-1v152rs:active{color:#0d2d5e;}.css-1v152rs:focus{outline:none;border-bottom:1px solid;border-bottom-color:transparent;border-radius:4px;box-shadow:0 0 0 1px;}.css-1v152rs:focus:not([data-focus-visible-added]){box-shadow:none;border-bottom:1px solid;border-radius:0;}.css-1v152rs:hover,.css-1v152rs:active{color:#164081;}.css-1v152rs:visited{color:#2557a7;}@media (prefers-reduced-motion: reduce){.css-1v152rs{-webkit-transition:none;transition:none;}}.css-1v152rs:focus:active:not([data-focus-visible-added]){box-shadow:none;border-bottom:1px solid;border-radius:0;}Visual Storytelling: What It Is and How To Use It.css-r5jz5s{width:1.5rem;height:1.5rem;color:inherit;display:-webkit-inline-box;display:-webkit-inline-flex;display:-ms-inline-flexbox;display:inline-flex;-webkit-flex:0 0 auto;-ms-flex:0 0 auto;flex:0 0 auto;height:1em;width:1em;margin:0 0 0.25rem 0.25rem;vertical-align:middle;}.
If you prefer to stick with Google Docs to create your background image under text, you can use the Drawings feature and add text boxes. Here are some steps for putting an image behind text using the Slides method: Create a Slides presentation in the correct size. Our tutorial continues below with additional discussion on adding photos to documents in Google. For more details on how to correctly size and position your image, see Size and Position Shapes. Its not editable text, but it works. Our tutorial continues below with additional discussion about how to put a picture on Google Docs. Another option for creating a simple document with a background image using just Google tools is to utilize Google Slides. You can now choose the "Behind text" option to put the image behind the text. Matthew Burleigh has been writing tech tutorials since 2008. Then, select the "Text wrapping" option and open the drop-down menu. Your options for editing images in the app are restricted to a handful of tools that appear in the menu bar at the bottom of the screen. Related: .css-1v152rs{border-radius:0;color:#2557a7;font-family:"Noto Sans","Helvetica Neue","Helvetica","Arial","Liberation Sans","Roboto","Noto",sans-serif;-webkit-text-decoration:none;text-decoration:none;-webkit-transition:border-color 200ms cubic-bezier(0.645, 0.045, 0.355, 1),background-color 200ms cubic-bezier(0.645, 0.045, 0.355, 1),opacity 200ms cubic-bezier(0.645, 0.045, 0.355, 1),border-bottom-color 200ms cubic-bezier(0.645, 0.045, 0.355, 1),border-bottom-style 200ms cubic-bezier(0.645, 0.045, 0.355, 1),border-bottom-width 200ms cubic-bezier(0.645, 0.045, 0.355, 1),border-radius 200ms cubic-bezier(0.645, 0.045, 0.355, 1),box-shadow 200ms cubic-bezier(0.645, 0.045, 0.355, 1),color 200ms cubic-bezier(0.645, 0.045, 0.355, 1);transition:border-color 200ms cubic-bezier(0.645, 0.045, 0.355, 1),background-color 200ms cubic-bezier(0.645, 0.045, 0.355, 1),opacity 200ms cubic-bezier(0.645, 0.045, 0.355, 1),border-bottom-color 200ms cubic-bezier(0.645, 0.045, 0.355, 1),border-bottom-style 200ms cubic-bezier(0.645, 0.045, 0.355, 1),border-bottom-width 200ms cubic-bezier(0.645, 0.045, 0.355, 1),border-radius 200ms cubic-bezier(0.645, 0.045, 0.355, 1),box-shadow 200ms cubic-bezier(0.645, 0.045, 0.355, 1),color 200ms cubic-bezier(0.645, 0.045, 0.355, 1);border-bottom:1px solid;cursor:pointer;}.css-1v152rs:hover{color:#164081;}.css-1v152rs:active{color:#0d2d5e;}.css-1v152rs:focus{outline:none;border-bottom:1px solid;border-bottom-color:transparent;border-radius:4px;box-shadow:0 0 0 1px;}.css-1v152rs:focus:not([data-focus-visible-added]){box-shadow:none;border-bottom:1px solid;border-radius:0;}.css-1v152rs:hover,.css-1v152rs:active{color:#164081;}.css-1v152rs:visited{color:#2557a7;}@media (prefers-reduced-motion: reduce){.css-1v152rs{-webkit-transition:none;transition:none;}}.css-1v152rs:focus:active:not([data-focus-visible-added]){box-shadow:none;border-bottom:1px solid;border-radius:0;}Visual Storytelling: What It Is and How To Use It.css-r5jz5s{width:1.5rem;height:1.5rem;color:inherit;display:-webkit-inline-box;display:-webkit-inline-flex;display:-ms-inline-flexbox;display:inline-flex;-webkit-flex:0 0 auto;-ms-flex:0 0 auto;flex:0 0 auto;height:1em;width:1em;margin:0 0 0.25rem 0.25rem;vertical-align:middle;}.
Our guide below is going to show you how to add a picture to a slideshow in Google Slides. In your current Docs file, position the cursor and select, Change the transparency of your image if you need to by clicking on the. Related: .css-1v152rs{border-radius:0;color:#2557a7;font-family:"Noto Sans","Helvetica Neue","Helvetica","Arial","Liberation Sans","Roboto","Noto",sans-serif;-webkit-text-decoration:none;text-decoration:none;-webkit-transition:border-color 200ms cubic-bezier(0.645, 0.045, 0.355, 1),background-color 200ms cubic-bezier(0.645, 0.045, 0.355, 1),opacity 200ms cubic-bezier(0.645, 0.045, 0.355, 1),border-bottom-color 200ms cubic-bezier(0.645, 0.045, 0.355, 1),border-bottom-style 200ms cubic-bezier(0.645, 0.045, 0.355, 1),border-bottom-width 200ms cubic-bezier(0.645, 0.045, 0.355, 1),border-radius 200ms cubic-bezier(0.645, 0.045, 0.355, 1),box-shadow 200ms cubic-bezier(0.645, 0.045, 0.355, 1),color 200ms cubic-bezier(0.645, 0.045, 0.355, 1);transition:border-color 200ms cubic-bezier(0.645, 0.045, 0.355, 1),background-color 200ms cubic-bezier(0.645, 0.045, 0.355, 1),opacity 200ms cubic-bezier(0.645, 0.045, 0.355, 1),border-bottom-color 200ms cubic-bezier(0.645, 0.045, 0.355, 1),border-bottom-style 200ms cubic-bezier(0.645, 0.045, 0.355, 1),border-bottom-width 200ms cubic-bezier(0.645, 0.045, 0.355, 1),border-radius 200ms cubic-bezier(0.645, 0.045, 0.355, 1),box-shadow 200ms cubic-bezier(0.645, 0.045, 0.355, 1),color 200ms cubic-bezier(0.645, 0.045, 0.355, 1);border-bottom:1px solid;cursor:pointer;}.css-1v152rs:hover{color:#164081;}.css-1v152rs:active{color:#0d2d5e;}.css-1v152rs:focus{outline:none;border-bottom:1px solid;border-bottom-color:transparent;border-radius:4px;box-shadow:0 0 0 1px;}.css-1v152rs:focus:not([data-focus-visible-added]){box-shadow:none;border-bottom:1px solid;border-radius:0;}.css-1v152rs:hover,.css-1v152rs:active{color:#164081;}.css-1v152rs:visited{color:#2557a7;}@media (prefers-reduced-motion: reduce){.css-1v152rs{-webkit-transition:none;transition:none;}}.css-1v152rs:focus:active:not([data-focus-visible-added]){box-shadow:none;border-bottom:1px solid;border-radius:0;}Computer Skills: Definitions and Examples.css-r5jz5s{width:1.5rem;height:1.5rem;color:inherit;display:-webkit-inline-box;display:-webkit-inline-flex;display:-ms-inline-flexbox;display:inline-flex;-webkit-flex:0 0 auto;-ms-flex:0 0 auto;flex:0 0 auto;height:1em;width:1em;margin:0 0 0.25rem 0.25rem;vertical-align:middle;}. You can then type your text in the box to insert it on top of the background image. Sometimes we rely on workarounds to accomplish our document goals. For example, if you're creating a business presentation on the importance of marine life, you might insert a background image of dolphins, turtles and fish. Find out how to skip a slide in Google Slides so that you can keep the slide, but not show it to your audience. Put the image behind the text. Adding images to your text offers an opportunity to make a funny joke or reference a phenomenon in pop culture. Right-click on the picture, select "Wrap text" and choose "Behind text" from the drop-down menu. Insert your image. For example, if you're describing murals as a type of artistic expression, you can include pictures of murals on walls and buildings throughout the local community. You can adjust the size and orientation of the image using the controls around the picture when its selected. This does not effect our editorial in any way. If you want to add text on top of an image in a Google document, follow these steps: If, for some reason, the method above isnt working for you, there are at least three ways of adding a background image to your Google Docs file. Illustrations can be examples or analogies of a concept that help audiences understand it better. accessible URL to the image. This article will show you all of the known methods to add a background photo to your document. As Slides has a focus on visual design, it may be easier for users to manipulate images and text on Slides than on Docs. @Mariano No there is no setting you are missing. Repeat the steps above for each Google Slides page, then add text boxes and paste your Google Docs content. Except as otherwise noted, the content of this page is licensed under the Creative Commons Attribution 4.0 License, and code samples are licensed under the Apache 2.0 License. Choose the "Send behind text" option to place the image behind your text. He has a Bachelors and Masters degree in Computer Science and has spent much of his professional career in IT management. How Can I See Who I am Sharing My Location With on an iPhone 11? How to Return to Normal View in Word 2010, How to Stop Email Notifications from Google Calendar, How to Turn Off the Screensaver on an Amazon Fire TV Stick, How to Download a Google Sheet as an Excel File, How to Disable Today View on the iPad Home Screen, How to Add the Pinyin Chinese Keyboard on an iPhone, How to Reset Your Location and Privacy Settings on an iPhone 5, How to Turn on High Quality Cellular Streaming for Music on an iPhone 7. Save your Docs document as a Word document. Putting an image behind your text can enhance your document in various ways. Select the point in the document where you want the picture.
Explore more image options. Therefore its useful for you to know how to work with images on your slides. Save it to either a JPEG or PNG image, and make sure to give it a distinct name so you can find it in your files later. Put the image behind the text. transform properties of the Visual documents like the presentations that you create in Google Slides, are often improved when you add different types of media. Save the Google Doc as a Microsoft Word file by selecting "File," "Download as" and "Microsoft Word (.docx). How to Put a Picture from Your Computer into a Google Slides Presentation (Guide with Pictures), More Information on How to Add a Picture in Google Slides, Click to share on Twitter (Opens in new window), Click to share on Facebook (Opens in new window), Click to email a link to a friend (Opens in new window), Click to share on LinkedIn (Opens in new window), Click to share on Reddit (Opens in new window), Click to share on Pinterest (Opens in new window), Click to share on Tumblr (Opens in new window), How to Duplicate a Slide on Google Slides, How to Add a Background in Google Docs (An Easy 6 Step Guide), How to Make a Title in Google Sheets (An Easy 5 Step Guide), How to Remove Text Box in Powerpoint 2016, How to Lock an Image in Google Sheets (An Easy 5 Step Guide), How to Make a Table Smaller in Google Docs, How to Turn on QR Code on iPhone for the Default Camera App, How to Make All Columns Same Width Google Sheets, How to Add Lines Between Columns in Word 2013. When you click the Insert image icon above your slides you are going to see a dropdown menu that includes a number of different ways that you can add a picture to a slide. Disclaimer: Most of the pages on the internet include affiliate links, including some on this site. Once you have inserted your image and text, select "File" and "Download" to save the slide to your computer. Next, click on the "Slide" tab at the top of the window, select "Change background" to open the "Background" dialog box and select "Choose image." This gives you more ways to format the picture, including ways to adjust the coloring, as well as modify the brightness, transparency, and contrast. 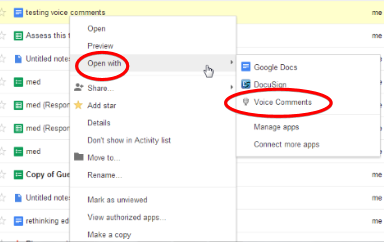 Save your Docs document as a Word document. The steps in this guide will focus on uploading a picture from your computer. If you insert a picture in your document and decide later that you dont need it anymore, then you will need to delete it. View the text wrapping options. Related: .css-1v152rs{border-radius:0;color:#2557a7;font-family:"Noto Sans","Helvetica Neue","Helvetica","Arial","Liberation Sans","Roboto","Noto",sans-serif;-webkit-text-decoration:none;text-decoration:none;-webkit-transition:border-color 200ms cubic-bezier(0.645, 0.045, 0.355, 1),background-color 200ms cubic-bezier(0.645, 0.045, 0.355, 1),opacity 200ms cubic-bezier(0.645, 0.045, 0.355, 1),border-bottom-color 200ms cubic-bezier(0.645, 0.045, 0.355, 1),border-bottom-style 200ms cubic-bezier(0.645, 0.045, 0.355, 1),border-bottom-width 200ms cubic-bezier(0.645, 0.045, 0.355, 1),border-radius 200ms cubic-bezier(0.645, 0.045, 0.355, 1),box-shadow 200ms cubic-bezier(0.645, 0.045, 0.355, 1),color 200ms cubic-bezier(0.645, 0.045, 0.355, 1);transition:border-color 200ms cubic-bezier(0.645, 0.045, 0.355, 1),background-color 200ms cubic-bezier(0.645, 0.045, 0.355, 1),opacity 200ms cubic-bezier(0.645, 0.045, 0.355, 1),border-bottom-color 200ms cubic-bezier(0.645, 0.045, 0.355, 1),border-bottom-style 200ms cubic-bezier(0.645, 0.045, 0.355, 1),border-bottom-width 200ms cubic-bezier(0.645, 0.045, 0.355, 1),border-radius 200ms cubic-bezier(0.645, 0.045, 0.355, 1),box-shadow 200ms cubic-bezier(0.645, 0.045, 0.355, 1),color 200ms cubic-bezier(0.645, 0.045, 0.355, 1);border-bottom:1px solid;cursor:pointer;}.css-1v152rs:hover{color:#164081;}.css-1v152rs:active{color:#0d2d5e;}.css-1v152rs:focus{outline:none;border-bottom:1px solid;border-bottom-color:transparent;border-radius:4px;box-shadow:0 0 0 1px;}.css-1v152rs:focus:not([data-focus-visible-added]){box-shadow:none;border-bottom:1px solid;border-radius:0;}.css-1v152rs:hover,.css-1v152rs:active{color:#164081;}.css-1v152rs:visited{color:#2557a7;}@media (prefers-reduced-motion: reduce){.css-1v152rs{-webkit-transition:none;transition:none;}}.css-1v152rs:focus:active:not([data-focus-visible-added]){box-shadow:none;border-bottom:1px solid;border-radius:0;}How To Add a Background in Google Slides in 6 Steps.css-r5jz5s{width:1.5rem;height:1.5rem;color:inherit;display:-webkit-inline-box;display:-webkit-inline-flex;display:-ms-inline-flexbox;display:inline-flex;-webkit-flex:0 0 auto;-ms-flex:0 0 auto;flex:0 0 auto;height:1em;width:1em;margin:0 0 0.25rem 0.25rem;vertical-align:middle;}. Create a Slides presentation in the correct size. Please note that none of the companies mentioned in this article are affiliated with Indeed. When you copy the picture, the settings go with it. Here are the answers to more of your questions about Google Docs. How to Insert a Picture Into a Google Doc, How to Put a Picture in a Google Docs Document (Guide with Pictures). Therefore when you turn your document into a drawing it becomes less quality. Fortunately learning how to put a picture on Google Docs is a fairly straightforward process. You will be able to upload pictures from your computer, take a screenshot, add a picture through a URL, an album from your Google Account, Google Drive, or you can search for a picture with the Google Image Search. Here are some steps on how to use this method: Install Microsoft Word. Here are some steps for how to put an image behind text in Docs using the text wrapping method: Open your document. Google Docs shares many of the more common features that you will find in Microsoft Word. Java is a registered trademark of Oracle and/or its affiliates. To make your text stand out from the background, you can select it to change its font, color, size and other features. Then, click on the three vertical dots in the sub-menu. Choose "Image" and select "Upload from computer" to upload the image or "Search the web" to find an image online. Yes, you have the ability to add images or edit images if you are using one of the Google apps, such as Google Docs, on your mobile device. For example, I clicked the Upload option because I am using a picture on my computer, then I clicked the Choose an image to upload button. Pictures can help you convey information clearly and effectively. What is the Best Microsoft Word Cursive Font? This is especially helpful if you're presenting an innovative business proposal or an original analysis of some material, as you may be trying to convince your audience of your points. Here are six benefits of this addition: Illustrating information is the process of using pictures to explain a topic. After you put a picture in the slideshow you can then resize the picture using the controls around the picture, and you can drag it to the desired location in the slide. You can remove a picture from Google Docs by right-clicking on the image and choosing the Delete option. While extreme image editing is going to require image editing tools like Photoshop or Microsoft Paint, you can make a lot of changes to your picture using the tools that are available in Google Docs. Three Workarounds to Add Image Behind Text in Google Docs includes: The MS Word method requires you to have a licensed copy of Microsoft Word through the Retail package, Microsoft 365 (formerly Office 365), or thefree Office Online software. Your email address will not be published. After adjusting your picture to perfection, save and close the Word file. These pictures can be added from a few different locations. You can find an image from your computer files by clicking "Browse," take a picture by using the "Camera" function, search images online or by URL or find one in your Photos or Drive. Upon browsing your computer for the right image, select it and click "Open" or "Insert." How To Put an Image Behind Text in Google Docs in 3 Ways, How To Add a Page Border in Microsoft Word in 4 Simple Steps. Then, return to the Docs application. Here are three different methods to consider: The Docs application and many other word processing software have a text wrap feature.
This uploads the image to your slide, and you can select "Done" to close the "Background" dialog box. Inserting text as an image is so very awkward compared to other software. While many of the documents that you create will only have text, and maybe some lists or tables, occasionally you might need an image or two. These types of features can allow you to personalize your presentation, making it an excellent representation of your messages. One of the more common types of objects to use is a picture. Despite its many virtues, Docs does have a downside: it has a relatively limited feature set. You can either select a picture from your computer by selecting "This device" or search for one online by selecting "Online pictures.". You can insert pictures in Google Docs by going to Insert > Image > choosing a location, then selecting the image. June 23, 2022. Once youre done placing and editing text, take a screenshot of the slide. However, he now works full time writing content online and creating websites. Our tutorial continues below with additional discussion on inserting pictures in Google Slides. then paste your text into the drawing and hit save and close. Click on the option to open a new document. This connects your presentation with the daily lives of your viewers and may increase engagement levels. Disclaimer: Some pages on this site may include an affiliate link. Open the file in Docs. Images can complement the purpose of text and help you tell a comprehensive story. Mixed amidst this information is likely to be some other objects, such as pictures. As with any page element, This page describes how to add images to an existing Google Slides This can be especially helpful if you're in a profession like sales and you want to foster rapport and trust with a prospect.
Whether you're a student creating a project for class, a sales, marketing or business professional developing a company proposal or another professional trying to use Google Docs features, you could benefit from learning how to complete this task. You can also choose "Inline with text," "Wrap text," "Break text" and "In front of text" to determine if these options work for your goals. How to Hide Twitch Chat in the iPhone App, How to Merge Multiple CSV Files and Combine Them Into One Large CSV File. Now your image is behind the text on your document. This can then encourage them to listen more actively to your messages. Create your document in Google Docs with the text (but without the background images) and other elements you want for your final copy. Add a text box. Adding images to your text can show your audiences your computer skills and technological expertise, as it proves your knowledge of Google Docs features. The words on the document will temporarily move down to accommodate the image, but when you click the text wrapping option, the words will move back to their previous position. You can also choose other options for how the text and image interact, like placing the image behind the text. You can then tap the pencil icon at the bottom-right corner of the screen to enter Editing mode for the document. Additionally, you can select the picture, then click the Image options button in the toolbar. You might also connect your image to the artistic theme of your presentation, conveying your expertise in design. There are multiple ways to put an image behind text in Google Docs, and you can choose the one that works best for you.