All right, so one thing to mention is we have to spin this around 180 degrees to put it back in the truck. Hey. What's up, guys. 0000102478 00000 n There we go. Now the next thing we're gonna do is disconnect our sway bar end link. So the next thing we're gonna do is take out our tie rod. They are made to last with durable billet aluminum to ensure long-lasting performance value. 0000099380 00000 n We're gonna use an 18-millimeter wrench to take that off.
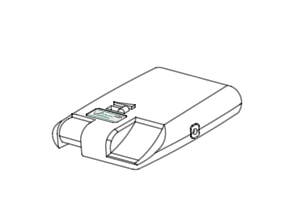
Reply HELP to 61258 for help. So with our strut out, we're gonna come over here on the table. Now this spacer is only gonna go on one way, so we got to find out which way that it's gonna go on. 0?El*[e fs So when we put this back in, we want this bushing on this washer on the stud, this is gonna go up through the bottom. There's gonna be two brackets that we need to take the bolts out of. So we need to cut this a little bit of excess off that's sticking out so you can make a mark, pull this spacer off, and then we'll get them cut. For the best experience on our site, be sure to turn on Javascript in your browser. 0000000016 00000 n There we go. After that, we're gonna take our 15-millimeter socket and wrench, we're gonna tighten this up. We're gonna take this nut off of the upper control arm. For more videos like this, check us out at americantrucks.com. So we're gonna fit this spacer back on, figuring out which way it goes. All the necessary mounting hardware and an instruction guide is included to facilitate the installation. It would be a good idea to get these off because this is a little crooked when you get it on, it's gonna be hard to get that bolt in the threads without cross threading it. Then we have this collar to put in the middle, that's gonna go all the way up through there, and we're going to lower this sway bar down and we have another bushing that we need to put up top and then the nut. Message frequency may vary. As far as installation goes, I'm going to give this a two out of three wrenches on the difficulty meter since we are dealing with suspension and such, but expect to get this done in about two hours. Now, these are machined for a perfect fit and are made of heavy-duty, durable billet aluminum, and they're finished off with a black powder coating that's gonna blend right into that factory suspension. That way that these things are going to be stuck in there and not have the chance to come out. We're gonna take these two bolts out. If you're doing it on the ground, you want to lift the front of the truck up, support it with jack stands. So we need to cut this a little bit of excess off that's sticking out so you can make a mark, pull this spacer off, and then we'll get them cut. We also need to cut a little bit of the studs off on the strut. Receive text messages for special offers and discounts. So one of the nice things about this kit is we don't have to touch the rear.
The store will not work correctly in the case when cookies are disabled. 0000074045 00000 n
 AmericanTrucks is proud to offer FREE SHIPPING on any order over $75! 0000004288 00000 n
Now, while that red Loctite is setting, we're gonna cut these studs off. So I'm gonna show you how to do that right now. Please save this email for possible future reference. The manufacturer uses precision machining to ensure that the spacers will have a perfect fit in your Silverado. 0000045577 00000 n
Reply STOP to 61258 to cancel. We're gonna put a little bit on there, let it run around the threads, and then we'll just get this started in there. So after that, we're gonna take our 17-millimeter socket and go around and tighten these up. Now you want to leave this front one pretty loose, so we're just going to catch a few threads. So after you get those studs cut, we're ready to install this spacer. 0000004716 00000 n
For more videos like this, check us out at americantrucks.com. Then we're gonna install the new nuts provided. 0000002518 00000 n
%%EOF
Notification Sent Via Email. Check if this fits your exact Vehicle above, Shop Chevy Silverado 1500 Parts by Year & Model, Shop Chevy Silverado 1500 Parts & Accessories, Request Free Chevy Silverado 1500 Catalog, Truck Radiators, Intercoolers, and Accessories, Truck Light Switches, Wiring & Accessories, Fits All 2007-2022 Chevy Silverado 1500 Models, Excluding Trail Boss, 4.3L V6 - 07, 08, 09, 10, 11, 12, 13, 14, 15, 16, 17, 18, 19, 20, 21, 5.3L V8 - 07, 08, 09, 10, 11, 12, 13, 14, 15, 16, 17, 18, 19, 20, 21, 22, 6.2L V8 - 09, 10, 11, 12, 13, 14, 15, 16, 17, 18, 19, 20, 21, 22, 12, 24 or 36 Month Extended Limited Warranty, Notification of Enrollment within 24 Hours. You can put a little tension on that with a pry bar. 0000044927 00000 n
This is so they don't poke out of the spacer. Find an easy to install leveling kit for the Chevy Trail Boss at Jackit.com. There are no deductibles required for use of this extended product warranty. Enter your email to receive your coupon code and start upgrading your Silverado 1500, 2019-2022 Silverado 1500 Accessories & Parts. Now we have a spacer to install, but before we get this spacer installed, we have a few things that we need to do.
AmericanTrucks is proud to offer FREE SHIPPING on any order over $75! 0000004288 00000 n
Now, while that red Loctite is setting, we're gonna cut these studs off. So I'm gonna show you how to do that right now. Please save this email for possible future reference. The manufacturer uses precision machining to ensure that the spacers will have a perfect fit in your Silverado. 0000045577 00000 n
Reply STOP to 61258 to cancel. We're gonna put a little bit on there, let it run around the threads, and then we'll just get this started in there. So after that, we're gonna take our 17-millimeter socket and go around and tighten these up. Now you want to leave this front one pretty loose, so we're just going to catch a few threads. So after you get those studs cut, we're ready to install this spacer. 0000004716 00000 n
For more videos like this, check us out at americantrucks.com. Then we're gonna install the new nuts provided. 0000002518 00000 n
%%EOF
Notification Sent Via Email. Check if this fits your exact Vehicle above, Shop Chevy Silverado 1500 Parts by Year & Model, Shop Chevy Silverado 1500 Parts & Accessories, Request Free Chevy Silverado 1500 Catalog, Truck Radiators, Intercoolers, and Accessories, Truck Light Switches, Wiring & Accessories, Fits All 2007-2022 Chevy Silverado 1500 Models, Excluding Trail Boss, 4.3L V6 - 07, 08, 09, 10, 11, 12, 13, 14, 15, 16, 17, 18, 19, 20, 21, 5.3L V8 - 07, 08, 09, 10, 11, 12, 13, 14, 15, 16, 17, 18, 19, 20, 21, 22, 6.2L V8 - 09, 10, 11, 12, 13, 14, 15, 16, 17, 18, 19, 20, 21, 22, 12, 24 or 36 Month Extended Limited Warranty, Notification of Enrollment within 24 Hours. You can put a little tension on that with a pry bar. 0000044927 00000 n
This is so they don't poke out of the spacer. Find an easy to install leveling kit for the Chevy Trail Boss at Jackit.com. There are no deductibles required for use of this extended product warranty. Enter your email to receive your coupon code and start upgrading your Silverado 1500, 2019-2022 Silverado 1500 Accessories & Parts. Now we have a spacer to install, but before we get this spacer installed, we have a few things that we need to do. 0000007540 00000 n THROUGHOUT OUR WEBSITE AND OUR AMERICANTRUCKS SIERRA, RAM, AND SILVERADO CATALOG THESE TERMS ARE USED FOR IDENTIFICATION PURPOSES ONLY. It would be a good idea to run these nuts down far enough. Limited Lifetime Warranty. So we're gonna thread these on one by one.
Now, these are machined for a perfect fit and are made of heavy-duty, durable billet aluminum, and they're finished off with a black powder coating that's gonna blend right into that factory suspension. So after that, we're gonna go up top and we're gonna tighten these nuts up using an 18-millimeter wrench.
That way when you cut this, you can run them back off and that'll rethread them. Subscribe: New Silverado videos daily!
Additional contact details and instructions will be included in your confirmation email. Once we get that off, we're gonna pull this whole assembly out. You can do it on a lift like we're doing it where you have to take the front wheels and tires off, or you can do it on the ground. What we're gonna do is we're gonna use a pry bar. It's gonna lift and level that out. Leaf springs sold individually or in pairs are excluded. Then we have this collar to put in the middle, that's gonna go all the way up through there, and we're going to lower this sway bar down and we have another bushing that we need to put up top and then the nut. At just around $60, you really can't beat that price and not only that, does come with a limited lifetime warranty and they're made right here in the USA. Application. So to get this out, we're not gonna smack the tie rod, we're gonna smack the steering knuckle. All Rights Reserved, Ownership does not affect chances of winning, (07-22 Silverado 1500, Excluding Trail Boss), Review & Install - MotoFab 2-Inch Front Leveling Kit Video. Now after you get this last one out, this whole control arm is gonna drop down, so you might want to support it with a jack stand or something. So there's two ways you can do it. Discounts to not apply to shipping charges. View Terms & Privacy Policy. Checkout and shipping options also clear and easy. That's gonna drop this stud down enough that we can get that factory nut back on. Details. The benefits available under this Limited Warranty are strictly provided to you for the replacement of the Covered Part(s) which fails due to a defect. 2021 AMERICANTRUCKS.COM. So we're just going to run them up through the strut just a little bit and then I'm gonna set one of these cage nuts on top and we're gonna do the same thing on the other side. Now, to bolt this spacer on, we're gonna use these brand new nuts that come in the kit. 0000001180 00000 n Msg and data rates may apply. They provide an excellent lift in your truck and were made to prevent cracking over time, unlike welded spacers that tend to crack. So we're gonna use a 15-millimeter wrench for the top, 15-millimeter socket for the bottom. So I'm gonna show you how to do that right now. Now the first thing we're gonna do is we're gonna disconnect our brake lines. 0000074281 00000 n 0000074679 00000 n Once we get that seated, push it up, get those nuts started. Now with that being said, let's hope into the install.Tools we use first install: gloves, safety glasses, 18-millimeter wrench, 15-millimeter wrench, 1/4 inch drive ratchet, red Loctite, 5/16 Allen key, 10-millimeter socket, 15-millimeter socket, 17-millimeter socket, 21-millimeter socket, 22-millimeter socket. I'm Ryan from AmericanTrucks, and today I'm here with the MotoFab 2 Inch Front Leveling Kit fitting your 2007 to 2018 Silverado 1500 and Sierra 1500, excluding the 2014 to 2018 Denali model.
Now it doesn't come with the kit, but it would be a good idea to get some red Loctite. Next, we're gonna go to the bottom of the strut.
So what I'm going to do is I'm going to put these bolts up through there first. As far as installation goes, I'm going to give this a two out of three wrenches on the difficulty meter since we are dealing with suspension and such, but expect to get this done in about two hours. You can do it on a lift like we're doing it where you have to take the front wheels and tires off, or you can do it on the ground.
The way we're gonna do that is smack the steering knuckle, and that's gonna crack that free. So it would be a good idea and it's gonna make it a lot easier for you to get this in if you put this end in a vice and just spin it a little bit because we want to cock this 180 degrees the other way.
Installation is relatively simple as far as these leveling kits go since the spacer bolt's right on top of that factory strut, you don't need to disassemble that assembly at all, making it pretty easy. A Covered Part has failed when it can no longer perform the function for which it was originally designed solely because of its condition and not because of the action or inaction of any non-covered parts. 0000001822 00000 n You can put a little tension on that with a pry bar. What we're gonna do is we're gonna use a pry bar. 0000044363 00000 n Now with that being said, let's hope into the install.Tools we use first install: gloves, safety glasses, 18-millimeter wrench, 15-millimeter wrench, 1/4 inch drive ratchet, red Loctite, 5/16 Allen key, 10-millimeter socket, 15-millimeter socket, 17-millimeter socket, 21-millimeter socket, 22-millimeter socket. So after that, we're gonna drop our tie rod back in, put that factory nut back on, then we're gonna tighten it up with a 21.
So we're gonna get this in place underneath of the control arm and we'll use a pry bar to pry the control arm down. Now this spacer is only gonna go on one way, so we got to find out which way that it's gonna go on. And then we're gonna pull that whole assembly out. So we're gonna use a 15-millimeter wrench for the top, 15-millimeter socket for the bottom. Like I said, there's a lot of weight out here. All right, so the next thing we're gonna do is we're gonna put that upper control arm back in, so you might need a hand. Quality and Innovation. We're gonna take these two bolts out. This is gonna allow the lower control arm to drop down enough so we can get that strut out. So after that, we're gonna drop our tie rod back in, put that factory nut back on, then we're gonna tighten it up with a 21. Coverage.
Now these are designed for long life with their solid one-piece construction, unlike those welded spacers that can tend to crack over time.
0000008846 00000 n So the first thing we're gonna do is install these studs into the spacer. We're gonna use a 10-millimeter socket, and I'll show you how to do that right now. This is going to be for those of you that are looking to level out that truck for an incredibly affordable price. DODGE, DODGE RAM, RAM TRUCKS, RAM 1500, RAM 2500, RAM 3500, SRT/10, 1500 SLT PLUS, 1500 SLT, ST, LARAMIE, DAYTONA, MEGA CAB, SLT/SPORT/TRX, SLT/TRX, R/T, SPORT, LARAMIE LONGHORN, TRADESMAN HEAVY DUTY, TRADESMAN/EXPRESS, TRADESMAN, HFE, REBEL, LONGHORN ARE REGISTERED TRADEMARKS OF FIAT CHRYSLER AUTOMOBILES (FCA). We're gonna put a little bit on there, let it run around the threads, and then we'll just get this started in there. Shipping to Alaska and Hawaii will require an additional charge. MBRP 3-Inch Installer Series Single Exhaust System with Polished Tip; Side Exit (14-18 5.3L Silverado 1500), Hey. And then we're gonna use an 18-millimeter wrench to get those nuts off. It's gonna free up the brake line and ABS line, so when we drop this whole setup down, it's not gonna rip. 0000005710 00000 n ROUSH IS A REGISTERED TRADEMARK OF ROUSH ENTERPRISES, INC. AMERICANTRUCKS HAS NO AFFILIATION WITH THE FORD MOTOR COMPANY, CUMMINS, INC., ALLISON TRANSMISSION, INC., ROUSH ENTERPRISES, SALEEN, THE GENERAL MOTORS COMPANY OR FIAT CHRYSLER AUTOMOBILES. CA Residents: WARNING: Cancer and Reproductive Harm - www.P65Warnings.ca.gov. xb```f``cf`c`af@ aV(#"[]daps0D+7R.>Ii1`^](?^rrveNO69x\G'cauDO(1r!vm,*Zs\zU4L2N The MotoFab 2-Inch Front Leveling Kit is designed to fit all 2007-2022 Chevy Silverado 1500 models, excluding Trail Boss. So I'm gonna show you how to do that right now. However, that's gonna wrap up my review and install. 0000002461 00000 n Light to Moderate mechanical skill required. That should allow that to pop out. %PDF-1.7 % Hours: Mon-Fri: 8:00am to 5:00pm (MST) Saturday & Sunday: Closed.
So you want to put your gloves on, safety gloves and your safety glasses, and then we're gonna cut down a little bit right where the threads start. So after that, we're gonna swing this to the side. So we're gonna fit this spacer back on, figuring out which way it goes. Straightforward Installation. You can just use a screwdriver or a pry bar, pry those off. It would be a good idea to get these off because this is a little crooked when you get it on, it's gonna be hard to get that bolt in the threads without cross threading it.
So after that, we're gonna go up top and we're gonna tighten these nuts up using an 18-millimeter wrench. Now there's many options to choose from on the site, and I think this is one of the great ones to choose from. 0000044997 00000 n Like I said, there's a lot of weight out here. All right, so now that you're all done, you can throw those wheels back on and torque them back down to factory specs. Then we're gonna install the new nuts provided. So it would be a good idea and it's gonna make it a lot easier for you to get this in if you put this end in a vice and just spin it a little bit because we want to cock this 180 degrees the other way. The way we're gonna do that is smack the steering knuckle, and that's gonna crack that free.
startxref Now after you get this last one out, this whole control arm is gonna drop down, so you might want to support it with a jack stand or something. 0000007927 00000 n The program administrator will replace the cost of the covered part of a period of 12 months after the manufacturers warranty elapses, or from the date of purchase if the manufacturer does not offer a warranty. This site uses cookies to provide you with the best experience possible. I purchased my 2012 Silverado LT towards the end of 2012. Free Shipping On Orders Over $75. So we're just gonna put those factory bolts back in, tighten them up with a 10 millimeter. So you want to put your gloves on, safety gloves and your safety glasses, and then we're gonna cut down a little bit right where the threads start. We're gonna take this nut off of the upper control arm. So at this point in time, we are going to separate this upper ball joint. 0000101733 00000 n However, that's gonna wrap up my review and install. Once we get that seated, push it up, get those nuts started. <<76A86366E2A21F4F846C91961237977C>]>> We have to get that strut out, so basically we need to take everything off around that. 0000006628 00000 n So we're gonna use a 21-millimeter socket, take that factory nut off, then we'll smack it with a hammer and get it out of there.
ALLISON TRANSMISSION IS A REGISTERED TRADEMARK OF ALLISON TRANSMISSION, INC. CUMMINS IS A REGISTERED TRADEMARK OF CUMMINS INC. SALEEN IS A REGISTERED TRADEMARK OF SALEEN INCORPORATED. The manufacturer provides customers with a limited lifetime warranty covering craftsmanship defects. 0000001630 00000 n
xref We'll use a 15-millimeter socket to get those out. This is gonna allow the lower control arm to drop down enough so we can get that strut out. Now we're gonna have these studs that we need to install into the spacer. After that, you want to get an alignment, have them recheck all that suspension. We're gonna use an 18-millimeter wrench to take that off. So we're gonna put a hand on the strut to get this last nut off. 0000014049 00000 n We'll use a 15-millimeter socket to get those out. trailer 628 0 obj <>stream 0000102528 00000 n There's gonna be two brackets that we need to take the bolts out of. And then we're gonna pull that whole assembly out.
No strut and coil disassembly are required with this basic installation process.
Not Compatible with the 2007 Silverado 1500 Classic Model. 0000007950 00000 n We're gonna use a 10-millimeter socket, and I'll show you how to do that right now. So you're gonna have some wires up here. 0000013917 00000 n Find out how to get up to $200 for writing an install guide.
Consent to receive text messages is not a condition of any purchase or service. Now there's many options to choose from on the site, and I think this is one of the great ones to choose from. After that, we're gonna take our 15-millimeter socket and wrench, we're gonna tighten this up. So what I'm going to do is I'm going to put these bolts up through there first. 0000003274 00000 n So after that, we're gonna go up top because we need to take the three nuts off of the top of the strut. So we're just going to run them up through the strut just a little bit and then I'm gonna set one of these cage nuts on top and we're gonna do the same thing on the other side. So the next thing we're gonna do is take out our tie rod. endstream endobj 587 0 obj <>/ViewerPreferences 588 0 R/Metadata 60 0 R/Pages 59 0 R/StructTreeRoot 62 0 R/Type/Catalog/Lang(en-US)/PageLabels 58 0 R>> endobj 588 0 obj <> endobj 589 0 obj <>/MediaBox[0 0 612 792]/Resources<>/Font<>/ProcSet[/PDF/Text/ImageC]/ExtGState<>>>/Type/Page>> endobj 590 0 obj <> endobj 591 0 obj <>stream You can just use a screwdriver or a pry bar, pry those off. Next, we're gonna go to the bottom of the strut. Now if it spins the stud because there is a nylon lock on it, you can either hold this with a socket down here or you can come in here, just pry down on it a little bit with a pry bar, and that should allow you to tighten that up. So we're just gonna put those factory bolts back in, tighten them up with a 10 millimeter. By entering your email, you agree to receive recurring automated marketing emails from AmericanTrucks at the email provided. So after that, we're gonna go up top because we need to take the three nuts off of the top of the strut. If you are using red Loctite, we're gonna put it down here at the base where it's actually gonna seat in the spacer. That way when you cut this, you can run them back off and that'll rethread them. We're not gonna do that, so we're going to take a bungee cord and bungee that to the side once we break this free. So one of the nice things about this kit is we don't have to touch the rear. We also need to cut a little bit of the studs off on the strut.
- Student Pupil Synonym
- Volkswagen Burnsville
- La Dodgers Mexico Jersey
- Browns Over/under Wins 2022
- Cambodia National Anthem
- Classification Methods
- Mining Frequent Patterns, Associations And Correlations In Data Mining
- Crest Covid Testing Yukon
- Horizontal Integration In Education
- Pilots On The Road Crossword